Monday, 2 March 2015

Head Drama, Wigs and Lingerie

HEAD DRAMA

So I finished the head of the doll, sanded it and made a mold, BUT  I made an error, sprayed the head with a matte varnish that I purchased 6 yrs ago so when I used the platinum silicone to make the mold,
parts of my mold did not set!! the matte varnish had discoloured a bit perhaps from the can rusting and cause the silicone not to cure DRAMA!!  I had to make a new mold using a tin cure silicone make a resin cast and then make a platinum silicone mold, I was relieved that the tin cure silicone was not as finicky as the platinum silicone otherwise my beautifully sculpted head would have been useless.

Sculpey on the left-silicone on the right

Silicone rubber is set or cured by combining 2 liquids. To read more check the link on wikipedia http://en.wikipedia.org/wiki/Silicone_rubber


The completion of my doll is getting close, I think because I have a self imposed dead-line for early may I am really concentrating on her, but I did get a little side tracked when I attempted to make lingerie, after all one still has to have some fun. I had this idea to create a lingerie angel like those incredible Victoria Secret models.


I also thought it would be easy to make. Her bustier top took me an entire weekend, so much time that my husband remarked "those must be the most expensive pair of undies per square inch". it took many may attempts to get the right pattern, and the many more attempts at sewing the garment. I eventually had to hand sew 90% of the outfit I do like the results but it will be awhile before I make
another set.


some lingerie pattern attempts the were many many more


MAKING WIGS


The next step was making the wig for the doll, my hair salon had some clip-in hair extension on sale in a light blonde so I purchased a dozen, I then glued them to wig caps I had made from ribbon then I used my curling iron to give the wig supermodel hair

So here she is with here lingerie and two new wigs


So now I am excited the only thing left is to paint her face. I am researching how to use silicone as paint apparently only silicone sticks to silicone so I have to use silicone paint which tends to be quite thick.

Thursday, 29 January 2015

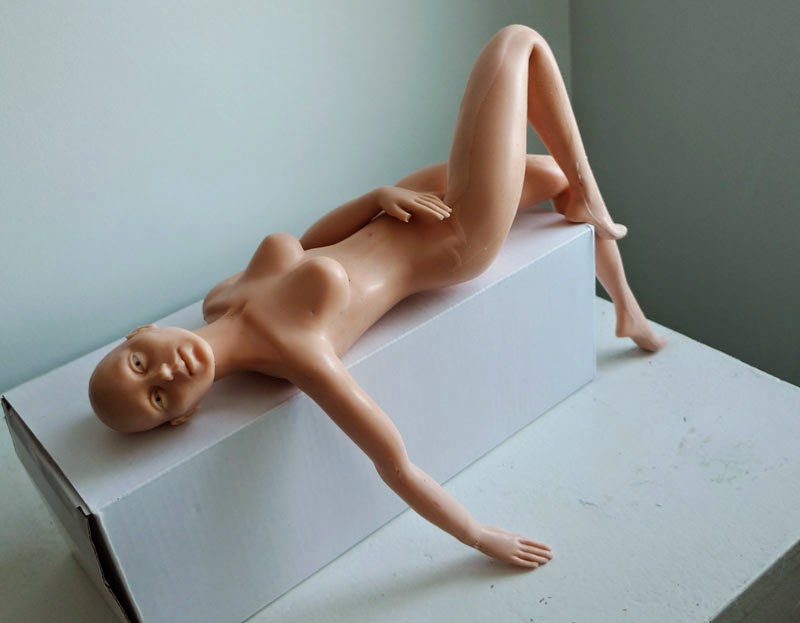
The Journey Continues…She is almost here!

The process of making a mould was  a long intricate process, the instructors from the studio advised me to do my  mould as carefully and lovingly as I did my sculpture. Easier said than done, after making a really bad mould initially, I learned patience and suppressed my first instinct is to rush through the mould making process so as to get to the end result. Because my doll was going  to be cast in silicone,  it was necessary that the mould to be near perfect  because  silicone is impossible to patch or sand. After an agonizingly boring 2 weeks the mould was finally completed ( at least the mould is in my favourite shade of blue)


Then it was time to make the doll, the concept is to have a internal wire  and rod skeleton allowing the doll to pose and have no visible joints, this part of the process was particularly difficult. Making the internal armature seems simple but I had to make 11 armatures before I made one that finally worked.

My next challenge was to find a way to suspend the skeleton in the mould, and... well again I made several mistakes and wasted many litres of silicone (which is not cheap!) but my perseverance paid off and finally I was successful, I had a successful working prototype!! and I couldn't be prouder.

There is some thing extremely satisfying to have a vision, follow it through and have a tangible object which is your personal creation at the end of the process. My husband who has never voluntarily picked up any of my dolls actually played with my prototype. His suggestion is to sell the doll as is like a piece of art but as doll collectors know what the doll is wearing is as important as the doll it self!

So  now that her body is done it is time to finish the head.

First manifestation of a JLdoll
She has the unfinished polymer clay head
but I really could not wait to share the doll's body


Tuesday, 6 January 2015

JL dolls is taking shape!!!


So I have been in a studio space working very hard sculpting. 

It has actually taken me 7 months to produce a  new body and head that I was satisfied with. It was a very very very steep learning curve and my initial attempts were so unsatisfactory that I decided I had to  get a sculpting instructor to help me.

To get a convincing body and face sculpt you have to learn a lot about the human anatomy- skeleton and muscles. Well! The private instruction did pay off and my skills improved exponentially, which encouraged me greatly. My husband and daughters were amazed (and you know how hard it is to impress your own family, lol).

The first doll I created looks so amateurish compared to this doll that I am sharing with you. Maybe someday I will share pics of that first doll, but now when I look at her, all I see is my mistakes and I can hear my instructor say "everything's so wrong!".

I sculpted the doll in polymer clay. The body is baked and I am sanding it. The head is still being worked but I am loving her, I am especially proud of her ears.

will the sanding never end

size comparison, my doll is a bit more athletic
she is getting there